Sunday, 29 July 2012

Quilter's Block?

No pun intended...

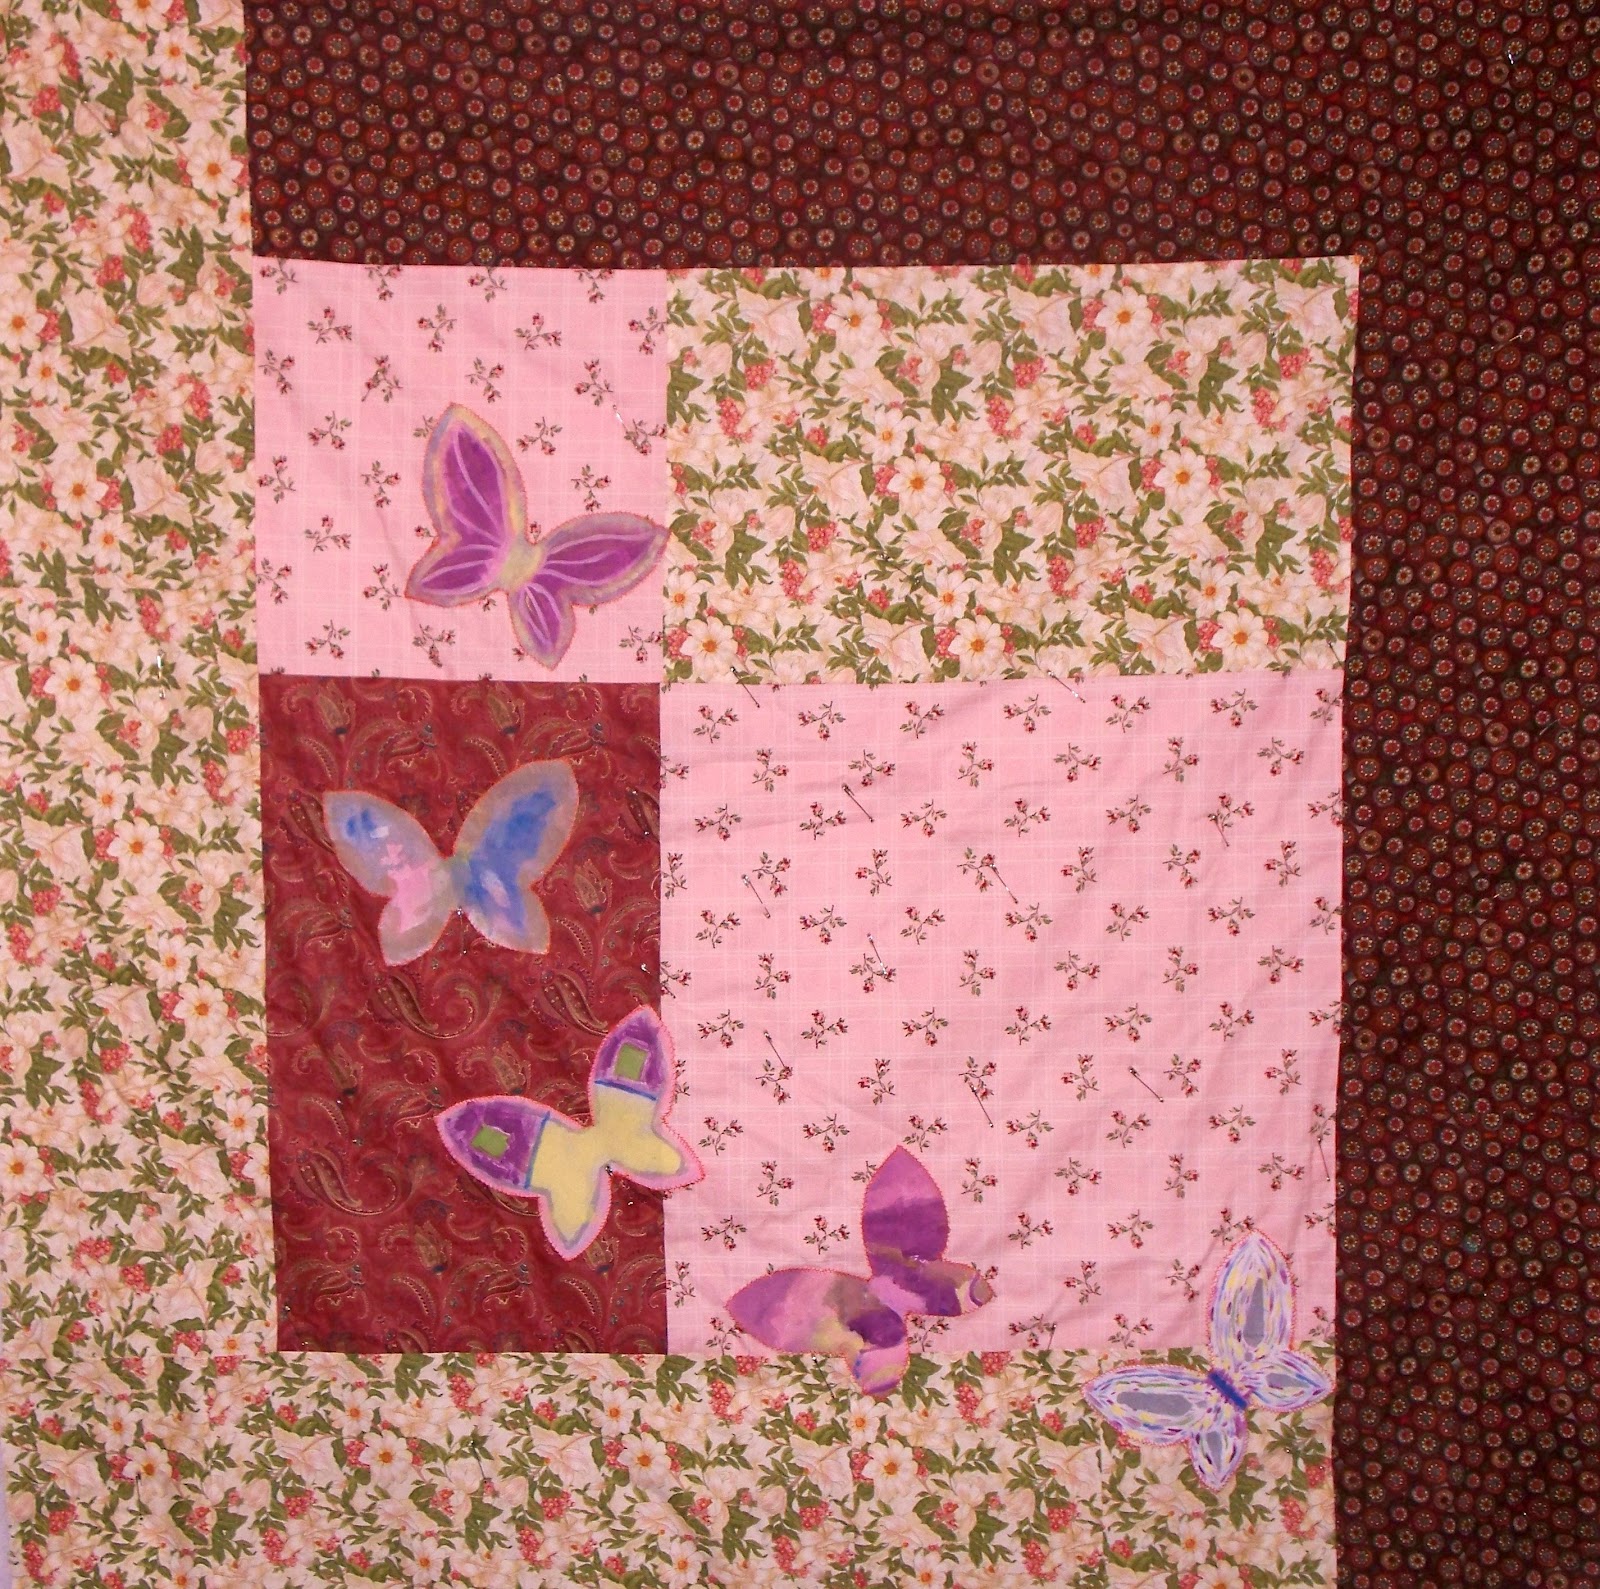
I believe I have a severe case of quilter's block, I just can't seem to find inspiration to quilt the butterfly garden or what to quilt it with. 
I've tried applique idea's and it all just look terribly busy, I've thought about just doing something basic and it feels too bland, I've thought of doing a specific type of quilting using stencils to create a scene and that seems like a good idea but I am still stuck! 

This poor quilt has been hanging downstairs for two weeks and I've stared at it and stared at it. Look to other's and pictures for inspiration and I've just drawn a total blank. Yep I am having a good old whining pity party to top it off lol. I want this done! I also feel like I am running out of time because I don't want to leave it too much longer.


Good news is I am nearly finished quilting my friend's quilt for her and it's looking great! I did indeed spend time pulling up stitches to remove the large puckers on the back, I ended up not spending just a couple of hours pulling it all but 7 or 8 hours since I was unhappy with the way the threads had looked once the puckers were cleared, I knew I could do a better job and thought why not just do it again? I had already pulled most of it, might as well do it all over correctly this time. 
I am very glad I did take the time to clean it up and get rid of what I considered a mess the bottom and top look so much better now, smoother and cleaner, I think Grandma will be happy with it.
I also spoke with my friend and asked if she would mind if I pulled her hand quilting she had done in the center embroidery panels, I was not feeling that the stitches she had done were going to be strong enough to hold once I had quilted the rest of the quilt, they were indeed basting stitches, done cross stitch style with a single thread. I knew once I had the outer edges quilted tightly the center was going to end up with a lot more weight than it would if it was quilted tightly too. I didn't want the center to fluff and puff or flop and flip at all, it would ruin all the work she had put in and I had put in, and would Grandma like it? Probably not. I am glad she agreed to allow me to quilt the inside by machine, the picture doesn't show the stamped pattern very well but it worked wonderfully under the machine, super easy to quilt just time consuming since I didn't want to make any really noticeable errors.  

The center area has me a bit stumped, the stamped pattern goes around these areas which has left a bit of a droopy area in the underneath, I've considered ditch stitching and discarded that idea since I figured if I missed and made a boo boo it was going to be a hell of a mess trying to fix it. I think my only option other than suggesting my friend quilt it by hand (My hand sewing blows the big chicken... it's horrible) is to do a yarn tie which actually might be just the thing. It looks right when I visualize it in my minds eye, in a light yellow or light golden yellow yarn, now I just have to learn how to tie :D!

Soon I will have pictures of my latest pattern in the works, I've got half of it put together at the guild and I am very excited to see it come out just as I had pictured. Only two things have slowed my progress, one is constantly forgetting my pattern book! The second is I had to learn how to make a diamond patch square, thank the Lord for youtube! I ran across a couple of wonderful video bloggers Crafty Gemini and the Missouri Quilt Co. Both of them had the exact instructions I needed to make the block. 
This is the video I used to get an idea of the block I was making. The center square is all I used and built it up into a 10" square (Unfinished is 10 1/2", I usually speak in the finished square sizing whether it's finished or not ;D)

My favorite video so far is actually done by Jenny Doan of the Missouri Quilt Co.:
I just love the quilt in the background, in the video she has a red, white and blue one that works even better than the lighter green, pink and blue in the background.  I will be making this quilt for my eldest daughter, I have just the perfect fabrics for it too. I can't wait!


Passion, in Creation!

Sunday, 22 July 2012


 The blind leading the blind!


No I did not do this handy work, even though I wish I did. A friend of mine has made this for her Grandmother and has requested my help in getting it put together into a quilt. 
What an adventure that has been! A novice quilter helping a non-quilter figure out how to quilt.. definitely  'the blind leading the blind'!
I did have the presence of mind to do a simple nine patch pattern for my friend, I showed her how to square off and cut her fabric which ended up a little wonky (just a little :D), then I showed her how to lay out her pattern and do a quarter inch seam and how to press the seams open, you know all the basics.  While we were doing all this I realized that the measurements I had made are going to be totally off since her blocks weren't square and we had to square them up, losing length and width, turned out we were quite a few inches off on either side length wise, width wise everything was fine as far as matching up seams and so forth, I still have no clue how I managed that! 
Anyway we ended up adding a 3 block strip to each side which made things a lot more even and doable but... it turned out I ended up redoing all the seams and that strip of green you see? It's polyester. /headdesk.  
I tried to convince my friend that we could hit my stash, I had some wonderful dark jade green cotton flat sheets that I picked up at a yard sale that would work wonderfully with the colours in the patches but she was adamant that this is the colour of green that she wanted and why undo all of that work we had already done?  
Yes I ran through all the problems with the polyester type fabric and it didn't seem to phase her so, doing my best I helped her fix it.  Once we had all the top pieces together It did look lovely, I haven't had a chance to take a full top picture since it's currently sitting under my machine being quilted. 
Of course I am quilting the polyester first as it will be and is the hardest part to quilt, poly and mostly polyester blends are not fun to try and quilt on a machine as I am discovering, I had to play with tension and my speed and motions as I went since I didn't have any fabric remnants that were even remotely similar to practice on. 
The silver lining in this dark cloud is the backing.  A wonderfully crisp and heavy cotton that is a dream to use while FMQ'ing, I have got to find some of it to use for quilting, turns out it was part of a bed sheet or tablecloth ( I can't remember which). I guess it's time to hit more yard sales!

You can see the pattern I am using to quilt with, basically a loopy line mixed with flower buds and leaves similar to what I was quilting Boxcar Suzie with but more fluid and graceful. It really helped to have all that practice under my belt with the first FMQ quilt, I am so much more confident going into this one. 
Of course not all is going as smoothly as I had planned, Murphy's Law dictated that as soon as I got the hang of quilting with the polyester and had done the majority of the sashing, I was going to discover a 6 inch long pucker in the back that I missed even though I check regularly, that I could leave alone and just quilt over the part that is still noticeable and yet... there is that voice inside my head going, yes it's going to take a whole lot of time and yes you are going to have to spend at least and hour more likely 2 ripping out the stitches but are you really happy sending that off when you know it's not right?  
I quickly discovered why I got the pucker, and I laughed so hard my husband came down to see what was wrong, turned out my non quilting friend didn't pin through all 3 layers! I of course double checked my pinning, didn't think to check hers and blithely started FMQ'ing without a clue. 
It is for a Grandma so all this strife will be worth the effort in the end and I am definitely learning some quick lessons!


Passion, in Creation!

Wednesday, 18 July 2012

A early finish... or was it a late one?!


Hurrah! Hurrah! It is finally done! I can now put Boxcar Suzie on the charity shelf and move on to other projects, frankly I am overjoyed to see the last of her. I've been looking at it too long and thinking about it too much. 
My feelings about this quilt have definitely done a 180 degree flip and I think that's interesting. I don't know if anyone else has had that happen with a particularly long project it seems there is this point where your excitement falls flat and you are just ready to be finished.

Contrary to what I may have implied I am still very proud of this quilt, it is not a bad job for only a second piece and it definitely was a labor of love. I did have one of my guild ladies ask me why I didn't set it aside to work on something else for awhile until I regained my excitement about it, at the moment of that question I was unable to give an answer. After thinking about it for a few hours I realized that it is simply in my nature to not leave any project unfinished and I also have the feeling that if I had left it, it may not have gotten finished because I would have probably ended up resenting the quilt for not finishing itself and making me feel guilty lol. 
I also am getting the feeling I won't have very many UFO's in my stash, no matter how terrible I think they might be, I really didn't think I could be that meticulous and methodical. Seriously, I ended up staying up until 3am to finish the binding because I had started it earlier that evening. Perhaps it's just obsessive insanity that overcomes quilters? 

I am particularly proud of how the back worked out with the graded thread colors, I was very worried that it would look horrible once I added the dark pink thread. The picture shows just how nicely it graded, I hope anyone else reading this gets inspired to try grading thread colors it really can look lovely.

Front View
The sea oat flower pattern at the center really does pull it all together and helps make the box pattern on the back really stand out.
Back view
The binding ended up being from a completely different fabric altogether, talk about frustration when you sew together all your remnants after measuring and being certain that you had the right amount and coming up this ----> ............ <------ short. /headdesk. 
Then when I went to the guild to use the table so I could square it up and looking for something that might work instead, I nearly ran across another disaster!  I had a couple of ladies help me pick out something that would work relatively well and they even measured the quilt, worked out the math for me told me exactly how many strips I would need, basically everything but the cutting hah! 
I did however listen to that little rebellious voice inside my head telling me that I need to cut an extra strip, even though I was assured that I didn't need to multiple times, had I not I would have been 80 inches short, as it was I ended up trimming off only 16 inches. I have learned to listen to that little voice ;)

All is well that ends well so they say!


Passion in Creation!

Wednesday, 11 July 2012


Another day.... Another excuse to quilt!

I have just discovered there is a good side to heat waves, it gave me the perfect excuse to totally ignore my housework and errands and hibernate in the basement to work on Boxcar Suzie for the last 2 days....
She is almost done! Hurrah! My first foray into free motion quilting has been a real eye opening experience, for the first few weeks I kept making excuses so I could go quilt and feeling guilt because I was doing something I loved. Yeah.. guilt.  
When I finally realized I was sneaking around the house making excuses like an addict would and acting like I was going to be in some serious trouble if I got caught, I kind of cottoned on to the idea that there is a problem with this situation. I spent 2 full days trying to figure out the cause of the guilt, it wasn't like I was ignoring my family, chores or other appointments in favor of sitting down at my sewing machine, (admittedly there was the occasional wistful thought in that direction), nor was I feeding my love of fabric and thread on the sly either.  So I just did not get why I was feeling like that and then it hit me, I have not given myself permission too! Sounds stupid doesn't it?  It's true though, I've been a Mom and a Wife for a decade and I haven't had much time to be just me, it wasn't until 6 months ago I had the epiphany that I could be myself again and everyone who didn't like it could sod right off. 

It's hard to make that transition from dedicated Mom and Wife who is the epitome of Responsibility, Action, Care and Organization to just being Me (or You..). You really do have to tell yourself that the house is not going to collapse, the kids are not going to end up in hospital and your Husband can find his own socks for once as well as make supper (and no he won't blow up the kitchen, I promise.) and you can be you for you for a couple of hours. 
Then you have to learn how to allow yourself to have fun and be fun again, this of course will age your children by 10 years when they finally discover you are a person as well as Mom,  and you are FUN! 
Today I did just that, it was over 30 degrees celcius, the kitchen faces south so it gets ALL the sun during the day and I was not going to wear myself out in the heat just to wash dishes and scrub floors so I took a day off! The kids are out at camp, dear husband was working and I had the whole house to myself for once and I did nothing! Well not nothing, I did say I would volunteer at the food bank, so I was there most of the morning... anyway that's beside the point. Once I got home, I ate a lunch that I like, read a book, sat outside in the shade and then spent the remainder of the afternoon doing what I love to do and that was quilt. I was cool, comfortable and relaxed... definitely a banner day.


Passion in Creation.

Monday, 2 July 2012

Inspirations

Morning Coffee & Grid Paper...

There is nothing like sitting down bright and early in the morning  with a fresh cup of java, sun is shining, air is crisp and it's just you and an idea. Strolling around in the backyard first thing, breathing in the morning air really invigorates and inspires me, hearing the birds sing as the sun breaks the horizon is like poetry (good poetry :D). 
I don't think I will ever go back to living in major cities, there is just too much to be missed in life when you are caught up in commuting and just accomplishing what everyone else is accomplishing, keeping up with the Jones' as it were, you know? I don't miss it at all, except I do miss being able to jaunt down to the fabric store, we are seriously in need of one! 
Wing pattern and FMQ'ing idea

This is what I was inspired the other morning to doodle up, I had a little fun with the picture and put in as my profile pic, yes I am rather camera shy, I'd rather take pics than be in them ;) Anyway, I am creating a very special project for a young lady whom I've never met, she's 11 I believe. This young lady heard about my daughter's struggle with leukemia at an early age and that we were going to do fundraising for the Canadian Cancer Society in the Relay for Life at the beginning of June. So she fund raised by herself, in her hometown (raising over $100 alone in two weeks) and then this amazing girl roped her mum into helping her create 50 hand crafted orange butterflies after researching what color is representative of which type of cancer. Needless to say I was totally blown away.

I racked my brain for a good way to say thank you, I knew I was going to do a quilt almost immediately but the question was, what type? The design had to be girly yet not childish or too adult and I wanted it to be unique and specific to her tastes as well as incorporating something personal from each member of my family.  In my previous posting I mentioned not liking to do square quilts, so inspiration came, heavily laced with irony, in the form of a square quilt design in a quilting magazine, which in another fit of irony I usually don't look at. 
I adapted the original version to fit my personal style, keeping the elements that had inspired my design. I wish I could show you the original quilt but I believe I already recycled or donated the magazine it was in. It was a very loud looking circus themed quilt with orange and green as the major colors, if you've read the same magazine you'll know exactly what I am talking about, very hard to miss. 
For the personal touch inspiration came from the butterflies she made, I found a lovely piece of clip art, (thank you to whomever created that and then made it free for personal use),  sized it and cut out the wing shape on thin white muslin. I spent 2 days figuring out that part and searching for applique pieces that didn't look terrible or cartoony, thankfully I ran across a message board that suggested using clip art. Then I spent another full day running all over town trying to find fabric paint that came in muted colors. I was completely out of luck, no one carried more than the basic colors, I was sure I would end up taking an expensive trip to the city trying to find some without any guarantee that there would be any in stock or the type I wanted. I felt a bit frustrated at this point and just about ready to toss in the towel on the whole butterfly idea, thank goodness I remembered something about using acrylic paint as a fabric paint. A little bit of research on the net told me what I need to know to change acrylics to fabric paint (textile medium) YAY! Now we are up and running!
Here's the end result:


Each one of us painted one and I used heat and bond to apply them to the quilt top, and satin stitched the edges with a special stitch on my Brother machine. A really nice bonus about painted fabric is it doesn't fray during washing or stitching, you do have to let any fabric painting you do cure and dry for atleast 24 hours before you heat set it. Using the iron on a medium set, dry press really well to set the paint and then wash the heck out it, in all sorts of water temperatures (put in a white scrap of the same muslin with the wash to test for bleeding) then dry them very well in the dryer. If they stand up to that sort of abuse then they are ready to be placed on your quilt.
So that's where I am at with this project, I've been trying to figure out what and how I am going to quilt around the butterflies, hence the drawing I did with the wind swirls. I am stuck with it at this point and the poor quilt is hanging on the clothes line in my sewing room, I still feel there is something missing so I won't put a thread in it until I am happy. Hopefully that will be soon.. I think it's time for more coffee, sunshine and graph paper.
The almost finished quilt top.


Passion in Creation.


Saturday, 30 June 2012

When to spend money

And what to spend it on....

A beginners guide to quilting.


I am an admitted cheapskate, if I don't have to buy things from department stores I won't. If I don't have to spend money on something that I can make from what I have on hand, I won't do that either. Even better is hitting second hand shops and yard sales and finding what you need at a steal there, saving yourself time as well as money and reducing waste, why not re-purpose at a fraction of the cost of new? 
All ranting aside, I've learned a few things in the last few months about what a person like me should spend money on and where to cut corners. First is machine needles, do not scrimp on your machine needles! Buying the cheaper variety needles may work for light weight projects but they will not work very well for quilting, as a matter of fact you will end up spending more money on the cheaper needles since you have to replace them so often. I buy the titanium type, they last longer and are stronger than general needles. I tend to yank and reef more than I should, I broke 3 general quilting needles in a row because I bent them while moving my quilt around the sewing machine. The titanium ones give a little but don't bend and will snap back into shape if you pull a little harder than you should, they also won't break if you have a particularly bad seam join like an average needle will. 

Secondly is thread, I personally will scrimp on the thread when I can but I always make sure it is a quality, strong thread made for quilting. I do not recommend anyone who is unfamiliar with thread to try and save money by buying a cheaper spools, especially cheap wal-mart or dollar store thread. Those threads are not made for quality and will break, ravel, knot, fray and bleed. When in doubt... buy quality and recognizable name brands and speak to a person whom you know is experienced with sewing or quilting, or ask at a quilt shop attendant (they may try to upsell you though, I would try the experienced seamstress first). 
The different types of thread are confusing too, my general rule of thumb is if you are hand sewing use cottons or silks (silk is difficult to use in a sewing machine, if it is not label for machine use, don't try it), if you are machine sewing use polyester or poly blends. Cottons, even cottons specifically made for machine quilting will break frequently unless they are top quality, even then they still break more often than a polyester thread.  Polyester threads are strong and durable, colorfast and have a nice sheen to them, the only time I have ever had poly threads break on a sewing machine is when I used really cheap brands for quick garb piecing and I didn't care if the garb fell apart after a few washing's. 

Also know the weight of your thread, if it's too heavy it will pull your fabric, and not sit well on your piece, lighter thread is better. The higher the weight the lighter the thread, 30weight, 40weight and 50 weight .. etc, also too are the ply's some threads are 2 ply and some are 3 ply, so a 50/2 will be lighter than a 50/3.
Determining what weight and type of thread you are going to use will ultimately be a personal choice, so try out a few different types and see what works best for you, I use only poly threads in a heavier weight than most quilters will use but it works for me. 
Oh and before I forget to mention it: Do NOT buy second hand thread unless you are positive it is coming from a reliable and trusted source. 2nd hand threads may be very old or dyed improperly and you really don't want the hassle of the lint build up in your sewing machine or having the thread break after a couple of washing's.

Third on my list is rulers and rotary cutters, I put these together because usually if you have one, you'll have the other. Kind of like a peanut butter and jam sandwich, you can have one or the other but it just isn't the same without them together. You can scrimp on rulers, buy them secondhand or at a yard sale as long as they are in decent condition and have good markings on them (preferably black lines or black and yellow), orange or red rulers are good too but require really good lighting to use and they can blend in with your fabric so black or black and yellow is preferable. I also recommend trying to buy a large 12" square and long ruler of the same brand if possible, because different brands mark their rulers differently you can end up with a slight wobble when trying to square up a quilt until you are more experienced with rotary cutting. Using youtube is a good way to educate yourself on how to properly square up and cut your fabric & quilt. The specialty rulers and shapes don't have to be the same brands at all since you will be using them individually to make the particular shape, do purchase ones in good condition with no breaks apparent secondhand if you can find them.

Do NOT scrimp on your rotary cutter blades! I would buy a rotary cutter secondhand as long as it is universal and takes all different brands of blades, but the blades themselves are the key to a smooth and even cut and they do wear out quite quickly, I did invest in a rotary blade sharpener which helps prolong the life of the blade but even then I still change out frequently. Now to qualify not scrimping on the blades, I don't mean to buy the most expensive brand possible, I mean buy them often and change them often. If your blade isn't cutting through your fabric properly then it is time to change or sharpen the blade. Sometimes you can get blades still packaged in second hand and charity stores or at yard sales, check the package for tampering and the blade for wear before buying.
While we are speaking of rotary cutters and blades, lets not forget the mat. You don't have to buy the most expensive self healing mat on the market and some are pretty pricey, I do however recommend that you buy the largest one you can afford and lets be clear it MUST be self healing, if it is not you'll end up with your blades dulling twice as fast and you'll have little scrapes, cut lines and holes that can ruin your cut and more than likely will catch on the back of your fabric, possibly ruining it. Yes you can buy self healing mats secondhand, but be sure to test the surface by running your hand over it and make sure it is smooth. If there are gouges or cut lines, its "life" has been used up. A good use for a mat that is no longer good to cut on is as a sewing machine mat, just put it under your sewing machine, it will lessen vibrations and prevent your machine from sliding on a table surface, very handy if you plan on using your machine to quilt quilts and don't have the drop down sewing tables.

My fourth bit of advice is about batting, now I would match the purpose of your quilt to the style of batting. The cheap brands can be very.. very.. bad, one of the worst I had seen pulled apart like cotton balls. Definitely not what you want to put in a quilt! If you are going to make a quilt for your kid who is going to drag it into God knows what and treat it like it's a mountain, super cape, railroad tracks, or whatever else a kids imagination is going to come up with. I would not bother with a expensive batting at all, chances are it will get abused just as badly. If anything I would buy an inexpensive but decent polyester batting from Wal-mart and use that or if you have flannelette sheets kicking about that are not being used, you can use 2 layers of flannelette and get a nice weight to the quilt, one layer if you want a summer weight. I would recommend pinning and thread basting or ditch stitching before you fold this up, flannelette will slide until it's moored well.

On the other hand, if your project is for a baby or a show quilt, or a quilt for your own bed, I prefer cotton or bamboo batting against polyester, it is obviously more expensive but a much nicer quality and if you want a good winter weight you should double up the batt since neither cotton or bamboo are good insulators. I haven't had access to wool batting personally but the grapevine at my guild says it is good to work with. 
You can also zigzag together batting out of your left overs, it is not optimal for important projects but it will do in a pinch and does work rather well for heavy fabrics since the seam will not show up.
Last but not least, something I am very passionate about... Fabric! Even before I started quilting I was an avid collector of fabric, quilting has just given me the excuse to acquire even more! This is where scavenging, hitting sales, yard sales, barter and trading will save you loads of money. On average (in Canada at any rate) a metre of good quality cotton is about $15 per, now you think that you are buying a minimum of 4 metres of fabric per quilt (always good to have extra) that's 60$ per quilt.. OUCH!!! When you get into buying precuts like fat quarters, charm squares and the like the price will increase. If you are like me with a large family and on a budgeted income, that is not something you can afford. 
So... here is where recycling, repurposing and remaking all play their large roles, if the fabric is good enough quality and the right type it doesn't matter if it is originally a shirt, blanket, dress, jeans, or whatever. You can make some amazing things just from scraps. If you want new fabric, hit the sale racks FIRST also ask if the store has a bargain bin and bolt ends to look through. This does take a bit of time since there is usually quite a bit of unwanted bits in there, however getting the deal plus extra fabric for less than what it would have cost you to buy a few metres directly off the rack is worth it.
One of my favorite places to hit are charity stores and donation stores, I've bought thousands of dollars worth of fabric for less than $200 that way. Our local charity shop sorts fabrics by colors, fills a large bag with them and sells the lot for 10$. Just the other day I ended up with  $50 worth of good quality cottons from one bag plus scrap bits I can use for a crazy quilt or an awesome 9 patch. Keep your eyes open and ears to the ground, the more people who know what you are doing means the more fabric you will end up with for free!

A final word about the gadgets and fun toys out there for quilters today, just because it looks like a good idea, doesn't mean it is a good idea for you. Some of the things I am thinking of that have tossed around by everyone who quilts and their dogs are things like pinmoors (really great idea but holy moley expensive!), machingers which are nylon gloves with grippy bits on them to help with gripping your quilt, not as pricey as the pinmoors but they could be out of budget range. Other things include binding clips, special needle threaders, needles painted with all sorts of different alloys to make them "better" etc.. etc.. etc... Just because it's shiny and new doesn't mean it's for you! (that makes me laugh hah!) 
You can substitute other things around your home or from a dollar store that will do the same thing that many of these products claim to do, for example: Pinmoors can be replaced with any type of condensed sponge that "self heals", look for a substitute in your local hardware store or dollar store. (I am using foam water noodles squished into vinyl tubing, keeps the foam packed and encourages "gripping" of the pin). 

For machingers go to your dollar store or gardening center and buy a pair of nylon gloves coated with nitrile, they will look like the palms of the glove and fingers were dipped in a plasticky looking paint, once you've brought them home to use, wear them on the wrong hands, the nitrile should be on top of your hands. The reason for wearing them on the opposite hand is the nitrile is very grippy, the whole hand will actually hinder your quilting process and there is just enough on the finger ends to give you the proper amount of grip. Of course it will feel weird at first, that's why I specified nylon. It will take a few wears for the gloves to conform to your hands but they will and it's not nearly as uncomfortable as trying to wear a cotton glove on the wrong hand, the nylon will flex with your hand, the stretching period is for the nitrile.

For the binding clips, try using hair clips, the ones that flex and snap. All the binding clips do is keep your binding straight and anchored to your quilt which is very handy but not necessary to spend that much money on something that looks like a clothespin (which will also work but they slip a bit). 

As for needles and needle threaders your answer to that lies in self-threading needles, I got my stash at the dollar store for a buck for 20 of various sizes. I do recommend having special quilting needles, the short, very sharp ones, you'll need them if you plan on hand sewing your bindings or doing hand piecing or hand applique, just don't fall for all the marketing nonsense. If they are cared for properly one set of the regular plain jane good quality ones will last for quite a few years. 


Hope this read helps you manage your quilting budget a bit:)


Passion in Creation.


Friday, 29 June 2012

Boxcar Suzie

Thinking Inside the Box?


This is my current project, I call her, (yes her ) Boxcar Suzie.  I came up with the name in a fit of inspiration... or insanity if you prefer... one day while listening to a conversation going on between my fellow guild ladies about naming their quilts and patterns. 
It never really occurred to me to name my quilts but I saw the logic behind it, it's similar to having raised your own cat from kittenhood (or dog.. I have cats lol), you simply can't spend that much time nurturing something without developing some sort of attachment, of course anything we are attached to gets a name right? Right.  
I ended up with some convoluted logic in the naming of the quilt, as it is pieced together in squares I was thinking squares .. squares within squares... stacked... boxes... boxes in boxes.. boxes making roads.. tracks... boxes making tracks, railroads, unwanted and hidden fabric.. train jumpers, hobos, Boxcar Willie.. Boxcar Suzie! I still don't quite get how my mind ended up at that conclusion but it works.
I did design this quilt pattern myself, I wanted simple, yet unique and I could have done simple sashing strips for each of the lines but I wanted it to have that pieced together look and feel, the picture doesn't quite capture the seam lines other than where the different shades join but each strip is pieced, it adds a kind of illusionary quality to the overall quilt I think. I found the fabric hidden in the "donation" piles at the guild, passed over many times by other people who missed the potential all three of these patterns had together, it was the fabric which inspired the design.


Bottom Border
I wanted to show what the border pattern looked like at the bottom and top of the quilt, there are 2 strips of border there as opposed to the single strip on either side.  I was very surprised at the effect having that extra strip created, it added depth and dimension to the center squares and seemed to make the quilt complete.  I am sure that it is a matter of perception but many of my guild ladies told me not to extend a square quilt with extra border on either end because it will look unbalanced. I nearly heeded their advice, I am sure glad the rebel in me broke out, forcing me to put the extra strips on ;).  Admittedly I have to add that I am not a huge fan of square quilts, personal preference, ---> why put a square on a rectangle?! It doesn't look right! Hah! Oh the irony of it all.....


Sea Oats
http://www.freemotionquilting.blogspot.ca/p/find-design.html


Anyway, moving along... I am pretty sure I've mentioned that I am learning how to Free Motion Quilt from Leah Day's blog.
The center square is a pattern called sea oats created by Leah Day that really inspired me, it's perfect for a center square and very natural, which I love. If you would like to look at the other patterns she's created follow the link under the picture.


I am sure you noticed that there are 2 different colors of thread, that is a purposeful accident. I didn't find the articles and blogs about how much thread FMQ'ing can use up until AFTER I ran out of thread, not that it was a bad thing that I did! I found the articles and blogs about using thread colors that matched your fabric too closely after nearly making myself blind trying to quilt the light pink fabric with a light pink thread which was of course, a near perfect match.  The only pink threads I have left in my stash are glaringly gaudy, burn your irises out fucshia's, hot pinks and purple pinks. In the right place those threads will be beautiful however the pinks in this fabric are very muted and delicate definitely not the place for a vibrant color. I dug out every box, sewing kit, junk container I had in order to find something that would work. I could have bought more thread to match certainly, I really didn't want to when I have so many spools that need to be used up, not to mention I really did not want to go blind by continuing with that pink color!

I finally found a beautiful peachy orange that was muted enough, I was a little shy about using it since it was so much different from the pink, surprisingly it worked really well.
Eventually I came to the conclusion that if I was going to change thread colors mid-quilting that I should change again and add a third color so the colors are even through the quilt. 3 boxes were quilted with the pink, 3 will get quilted with the peach and I will quilt the remaining with a 3rd color.  To pull it all together and too keep it from being unbalanced, I thought I would add some of the peach thread to the center square, my stitch ripper was ready just in case I hated the result....
I really do like the effect (yay!), having that peach color made the center square pop, I can't wait to see what it will look like with the 3rd color.

Sea Oats inspired quilting design, done in peach thread
Here is a close up of the pattern I am using to quilt with, I kept with the sea oats and added my own flair and dramatics. Leaves, spirals and little flower buds all weave their way through each set of boxes. I decided to quilt each strip individually, I am still not sure why, it seemed to make sense at the time. I am positive that I've made another leap of faith, trusted my convoluted logic again and made a relatively simple project that much more difficult just because that's how I roll.

Yes.. I am positive about that.


I am hoping to be done quilting within the next few days, I am about half way done with a total time of 12 hours logged in just quilting on my machine. I tell you though there is no place I would rather be. 

Passion in Creation.